How to Crash in Production: The Art of Unexpected Drama
•8 min read•••• views
•••
•8 min read•••• views
In React, when an error sneaks into your rendering process, it doesn’t just slip quietly into the background. Oh no, it makes a grand exit, taking your entire UI along for the ride. Picture it: your beautiful component tree, built with love and care, suddenly vanishes, leaving your users staring at a blank screen. It’s a scene straight out of a nightmare—unless, of course, you’ve got an Error Boundary in place to catch that fall.
An Error Boundary is like the bodyguard for your React components. When one of your components decides to crash the party, the Error Boundary steps in, catching the error before it causes a scene. Instead of your entire app crashing and burning, the Error Boundary lets you show a more graceful fallback UI—a polite way of saying, “Something went wrong, but we’re still here.”
Here’s the twist: React doesn’t come with a built-in Error Boundary component. But don’t worry, React gives you the tools to create your own. Let’s walk through how you can craft an Error Boundary and save your app from an untimely demise.
Creating an Error Boundary involves extending a class component and implementing two key lifecycle methods: getDerivedStateFromError and componentDidCatch.
Here’s a simple implementation:
import React from "react";

export default class ErrorBoundary extends React.Component {
  constructor(props) {
    super(props);
    this.state = { hasError: false };
  }

  static getDerivedStateFromError(error) {
    return { hasError: true };
  }

  componentDidCatch(error, info) {
    logErrorToMyService(error, info.componentStack);
  }

  render() {
    if (this.state.hasError) {
      return this.props.fallback;
    }
    return this.props.children;
  }
}getDerivedStateFromError: This method is like the canary in the coal mine. It updates the state when an error is detected, triggering the fallback UI.componentDidCatch: This is where you can log the error, maybe to an external service like Sentry (we’ll dive into that in a later chapter).Now, let’s put this Error Boundary to use:
import ErrorBoundary from "./ErrorBoundary";

const App = () => {
  return (
    <>
      <Navbar />
      <ErrorBoundary fallback={<p>Something went wrong</p>}>
        <Main />
      </ErrorBoundary>
      <Footer />
    </>
  );
};
If Main or any of its child components throws an error, your Error Boundary will catch it, display the fallback UI, and log the error. No more blank screens, just a gentle nudge to the user that something went wrong.
If you’re still rocking React below version 18, you might be disappointed to hear that you can’t create an Error Boundary with functional components. However, hope is on the horizon! The React team is experimenting with new options (onCaughtError, onUncaughtError, and onRecoverableError) in the canary version, which can be passed to createRoot. These options will eventually allow you to handle errors in a more flexible and functional way.
Error Boundaries are like seat belts—essential, but you don’t need them everywhere. Here’s how to use them effectively:
The “One Boundary to Rule Them All” Trap: You might think it’s smart to slap a single Error Boundary at the top of your app, but that’s like putting all your eggs in one basket. If an error occurs, you don’t want the whole app to disappear. Instead, be strategic.
Less is More: Don’t go overboard with Error Boundaries. Overusing them can slow down your app and clutter your code—like wearing five layers of sweaters in the summer.
Feature Boundaries Are Key: Place Error Boundaries at logical feature boundaries. As you work your way down your component tree, ask yourself, “If this component crashes, should its neighbors go down with it?” This helps you find the right spots for your Error Boundaries.
Design for Error States: By placing Error Boundaries at feature boundaries, you can create fallback UIs that are not just functional but also user-friendly. You might even add a retry option for specific features, making your app more resilient.
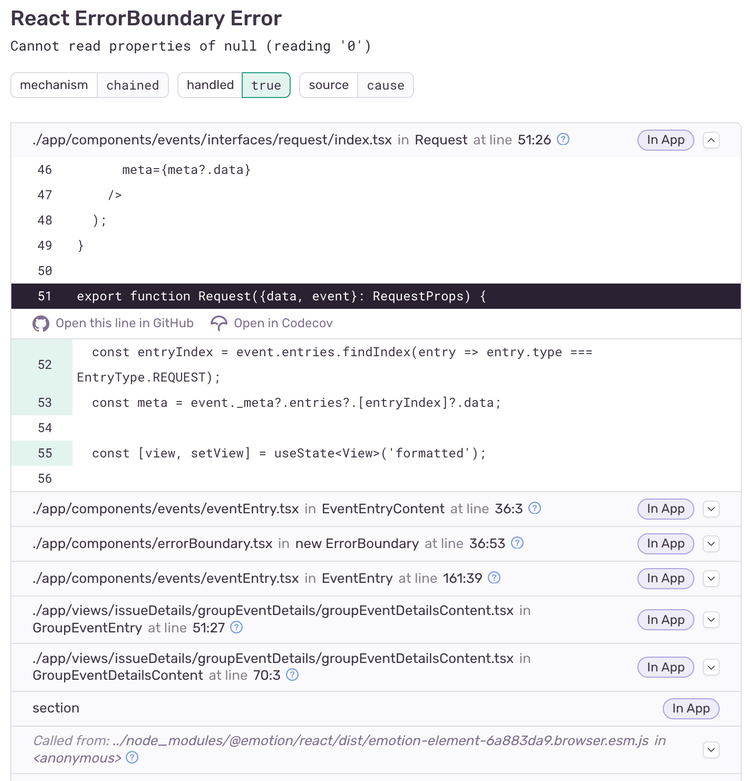
Now you've got your Error Boundary up and running, gracefully catching errors and keeping your UI from completely disappearing. But here’s the thing—catching errors isn’t enough. You also need to know what’s going wrong and where. That’s where logging and monitoring come into play. Enter Sentry, the tool that not only tracks your errors but also gives you the context needed to fix them.
You can integrate Sentry into your Error Boundary by logging errors in the componentDidCatch lifecycle method. But Sentry has made it even easier for you—they provide their own Error Boundary component, which you can use out of the box.
import React from "react";
import * as Sentry from "@sentry/react";

Sentry.init({ dsn: "https://your-project-dsn", tracesSampleRate: 1.0 });

const App = () => {
  return (
    <Sentry.ErrorBoundary fallback={<p>An error has occurred</p>}>
      <Dashboard />
    </Sentry.ErrorBoundary>
  );
};
With this setup, anytime an error occurs within the wrapped component, Sentry catches it and logs it for you. But here’s the real magic—Sentry gives you the full stack trace, so you can see exactly where the error happened. And if you’ve got your sourcemaps generated on deployment and hosted publicly, you’ll even get the stack trace mapped back to your original source code.
For projects built with Vite, you can upload your sourcemaps directly to Sentry using the @sentry/vite-plugin:
import { defineConfig } from "vite";
import { sentryVitePlugin } from "@sentry/vite-plugin";

export default defineConfig({
  build: {
    sourcemap: true, // Source map generation must be turned on
  },
  plugins: [
    sentryVitePlugin({
      org: "your-org",
      project: "your-project",
      authToken: process.env.SENTRY_AUTH_TOKEN,
    }),
  ],
});
This configuration ensures that your sourcemaps are private, meaning only you can access them. By uploading them to Sentry, you get detailed, context-rich error reports. And for an extra layer of insight, Sentry’s replay feature lets you see exactly what the user was doing when the error occurred, turning those frustrating bugs into solvable puzzles.
Pro Tip: Make sure not to expose your sourcemaps publicly. Sentry even provides a sourcemaps.filesToDeleteAfterUpload flag to automatically delete the sourcemaps from your deployment after uploading them. This way, your code remains secure while you get all the error-tracking goodness.
Now you’re not just catching errors—you’re tracking them, understanding them, and fixing them.
So, you've got logging and monitoring sorted out with Sentry, and now your errors are being tracked like a hawk. But let's be honest—you're not going to sit there refreshing dashboards all day waiting for the next bug to appear. What you need is a way to automatically get notified when things go wrong, so you can focus on fixing issues rather than finding them. Enter Zenduty—your go-to platform for alerting and incident management. Think of it as the command center for your production engineering team, helping you minimize downtime and keep your site reliable.
Integrating Sentry with Zenduty is a breeze. Here’s how you can set it up:
On Zenduty:
On Sentry:
Now, whenever something goes wrong in your app, Zenduty will notify the right person at the right time. If you’ve got a team, you can even set up an on-call roster. That way, the incident gets assigned to whoever is on call, ensuring a quick response without waking up the whole team in the middle of the night.
But wait, there's more! Zenduty isn’t just about Sentry. You can also integrate with tools like Uptime Kuma or Uptime Robot to get alerts when your site goes down, or GitHub to manage issues directly as incidents. Want to keep everything in one place? Push incident actions to Slack, MS Teams, or Google Chat and handle them right from your favorite messaging app.
Zenduty also comes packed with features like analytics, reporting on incidents, post-incident tasks, and even stakeholder communication tools. It's like having a Swiss Army knife for incident management. And the best part? It's free to get started. With its robust API and extensive integrations, Zenduty gives you all the tools you need to stay on top of your alerting game—no matter where the fires are breaking out. So, go ahead, try it out, and sleep a little easier knowing you’ve got Zenduty watching your back.
Now you're fully battle-equipped to handle anything production throws your way. With Error Boundaries catching crashes, Sentry logging the details, and Zenduty keeping you alert, you're ready to face errors head-on without breaking a sweat!